Deploy Hugo static site to Azure Storage and Azure CDN using GitHub Actions
June 23, 2020
Introduction #
You may have noticed the impressive speed at which this website loads. This is because it was built using a static site generator (Hugo) and deployed to Azure (Blob) Storage, with caching enabled via Azure CDN. This deployment configuration allows us to enjoy one of the cheapest solutions, with an estimated cost of £1 per month for storage and CDN. Right, to the main topic:
GitHub Actions #
GitHub Actions provides the flexibility to setup a CI/CD workflow, allowing us to automate our build, test and deployment pipelines. This means we can define a workflow to automatically build and deploy our web application to Azure Storage and Azure CDN based on Git repository events i.e. push or pull-request.
Hugo workflow #
The overall plan is to configure a GitHub Actions workflow, so that with every push to our release branch (master), website resources are built, minified and copied over to Azure Storage. The workflow should also purge the Azure CDN cache as a final action.
We’ve categorized the steps to be taken in the outline below:
| Section | Steps |
|---|---|
| Create keys and credentials | Step 1. Retrieve Azure Storage connection string Step 2. Create a Service Principal (for Azure CDN) Step 3. Create a GitHub Personal Access Token |
| Securely persist keys and credentials | Step 4. Configure GitHub Secrets |
| Setup and deploy CI/CD workflow | Step 5. Configure GitHub Actions workflow |
Prerequisites #
Before you start, make sure to have the following requirements in place:
- We expect you to have configured your Azure Storage account to serve static web content.
- The Azure CDN should also be linked to the Storage account.
If you need to setup the prerequisites, the following documentations should help:
Steps #
Step 1. Retrieve Azure Storage connection string #
You can access your Storage account connection string via Azure Portal or the Azure CLI. We’ll go over the two options starting with the Portal:
Open Azure Portal.
Navigate to Storage accounts and select your storage account.
Select Access keys under Settings in the sidebar.
Copy the Connection string value for
key1orkey2.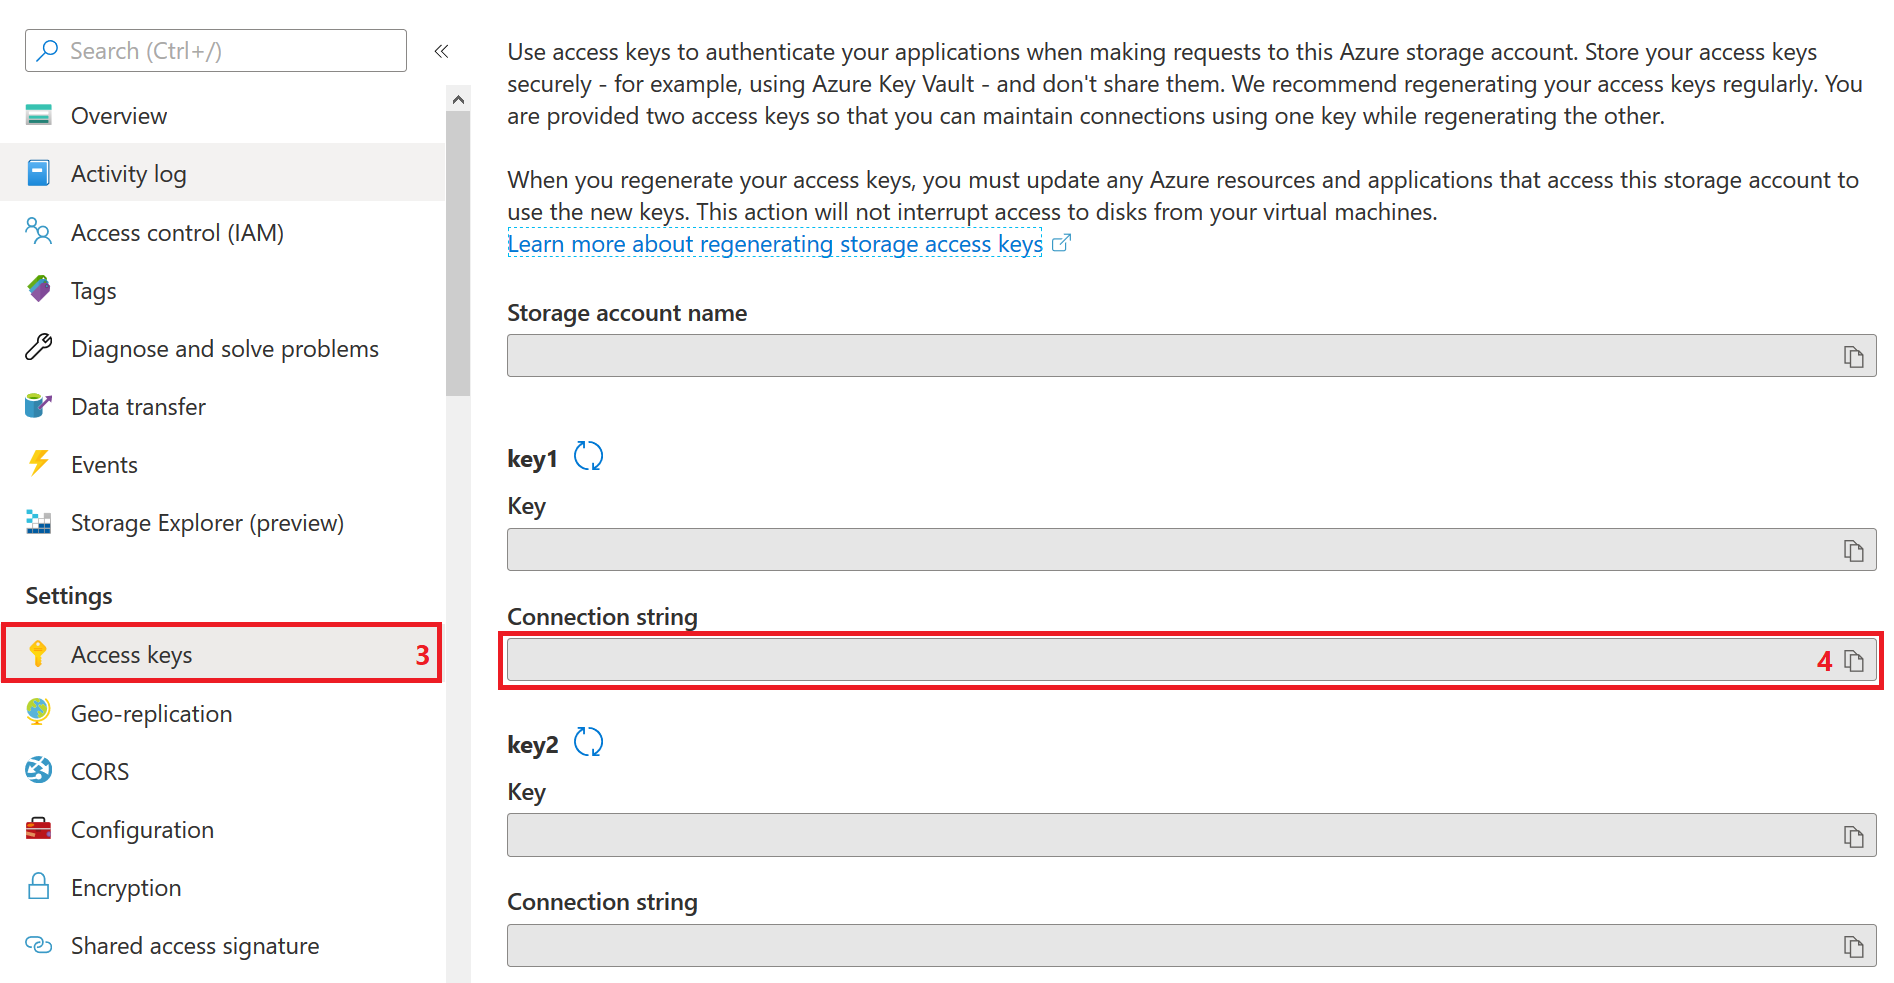
Alternatively, to get the connection string using Azure CLI, you can use Azure Cloud Shell on Azure Portal, or perhaps install and configure the CLI on your local development machine.
To retrieve a Storage account connection string via CLI:
Login to your Azure account if you haven’t yet. This step is not required when using Azure Cloud Shell because you’ll be automatically authenticated on Azure Portal.
az loginReplace
<group-name>with the name of your resource group,<storage-account>with the name of your storage account, and run this command:az storage account show-connection-string -g <group-name> -n <storage-account>The result from the execution of the command should look similar to this:
{
  "connectionString": "<connection-string>"
}
Copy the value in place of
<connection-string>.
Step 2. Create a Service Principal (for Azure CDN) #
There are various ways to create a service principal. Again, you can approach this through Azure Portal, Azure Cloud Shell or using Azure CLI on your local machine.
We will not cover the steps using Azure Portal in this post. This guide from Microsoft is detailed and covers all steps required.
Follow the steps below to create and access your service principal credentials using Azure CLI:
Replace
myAppin the command below with an appropriate name for your service principal,<subscription-id>with your Azure Subscription ID, and<group-name>with the name of your resource group. Subsequently, run the command.az ad sp create-for-rbac --name "myApp" --role contributor --scopes /subscriptions/<subscription-id>/resourceGroups/<group-name> --sdk-authAs of the date this article was published, letter/white spaces invalidates the name of a service principal. Hence not allowed.
The results of the executed command should look similar to this:
{
    "clientId": "<client-id>",
    "clientSecret": "<client-secret>",
    "subscriptionId": "<subscription-id>",
    "tenantId": "<tenant-id>",
    "activeDirectoryEndpointUrl": "https://login.microsoftonline.com",
    "resourceManagerEndpointUrl": "https://management.azure.com/",
    "activeDirectoryGraphResourceId": "https://graph.windows.net/",
    "sqlManagementEndpointUrl": "https://management.core.windows.net:8443/",
    "galleryEndpointUrl": "https://gallery.azure.com/",
    "managementEndpointUrl": "https://management.core.windows.net/"
}
Copy the json result.
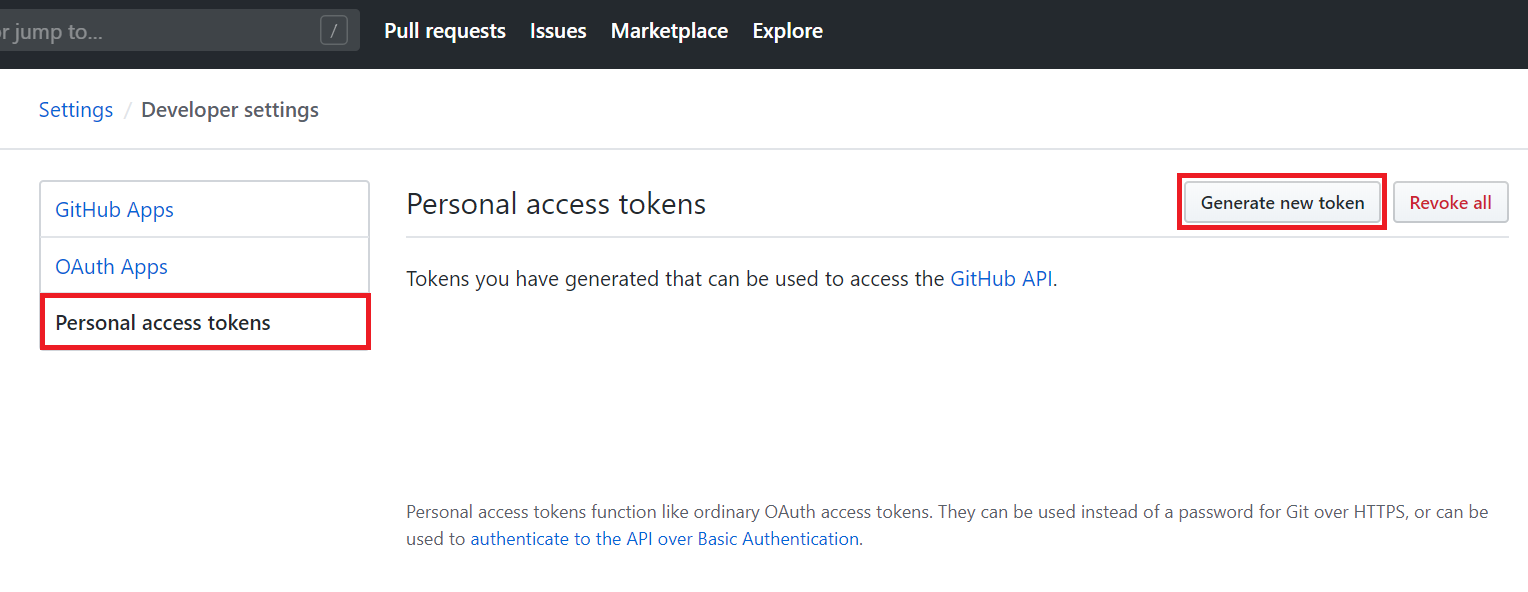
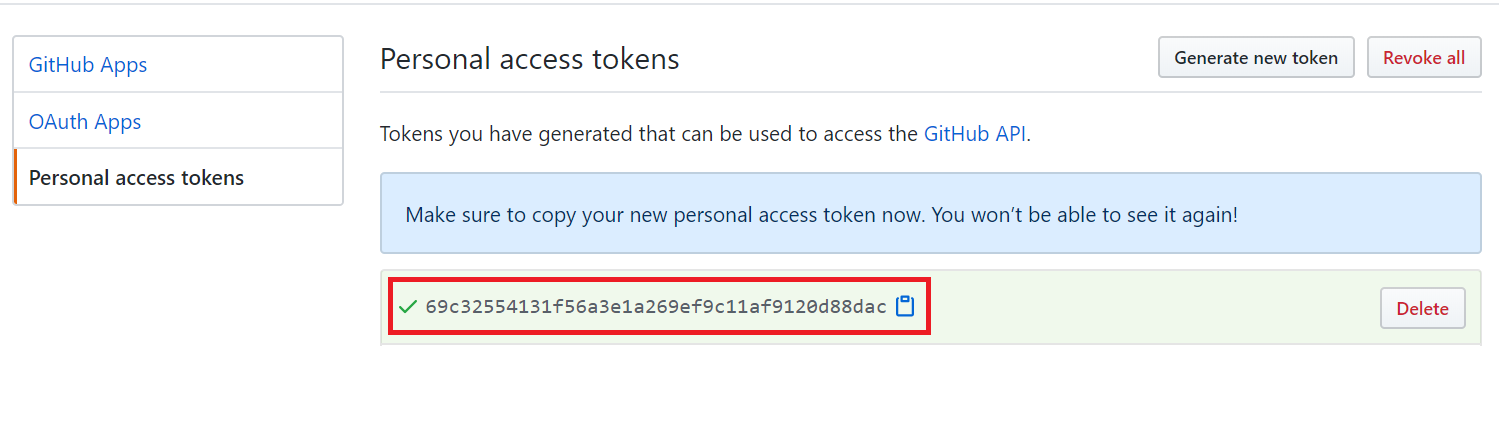
Step 3. Create a GitHub Personal Access Token #
A crucial step is to enable the GitHub Actions workers to successfully authenticate and access the content of our repository, for deployment. This is achieved using a personal access token generated from your GitHub account.
In order to create a personal access token:
Open GitHub, and go to Settings.
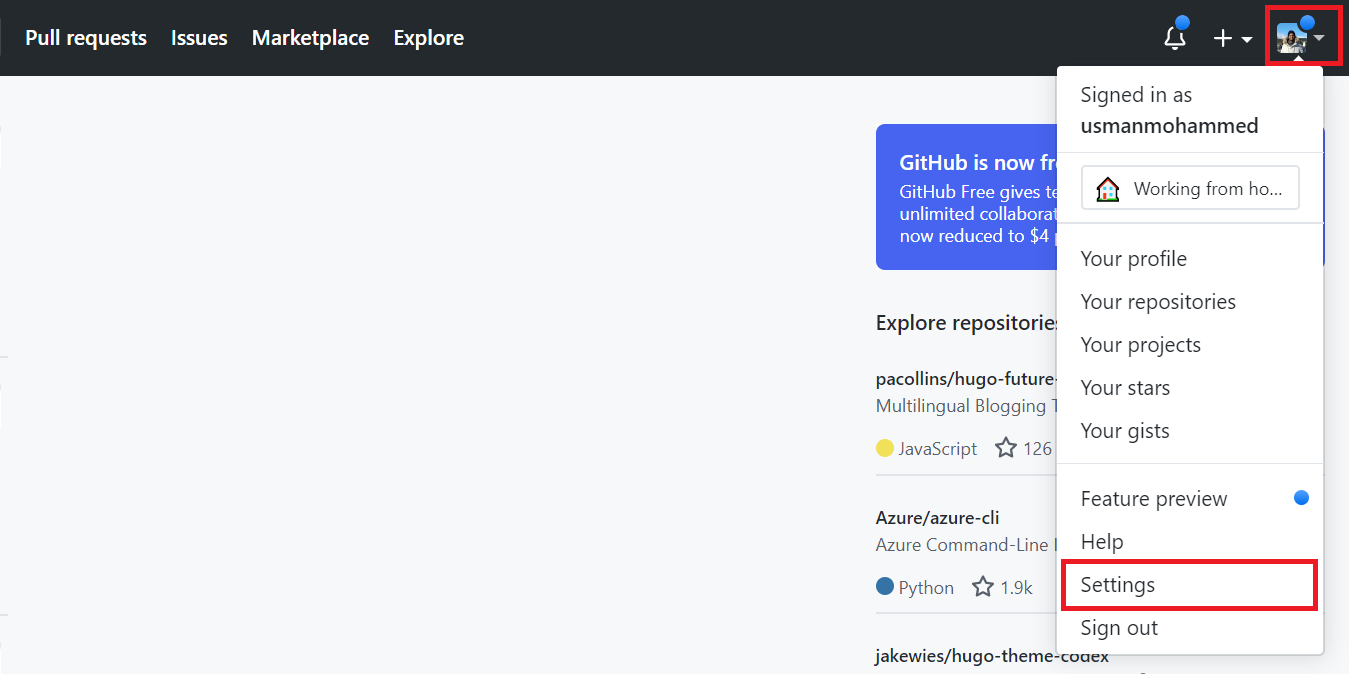
Navigate to Developer settings > Personal access tokens > Generate new token.
Complete the Note field, tick/check the
public_repooption and click Generate Token.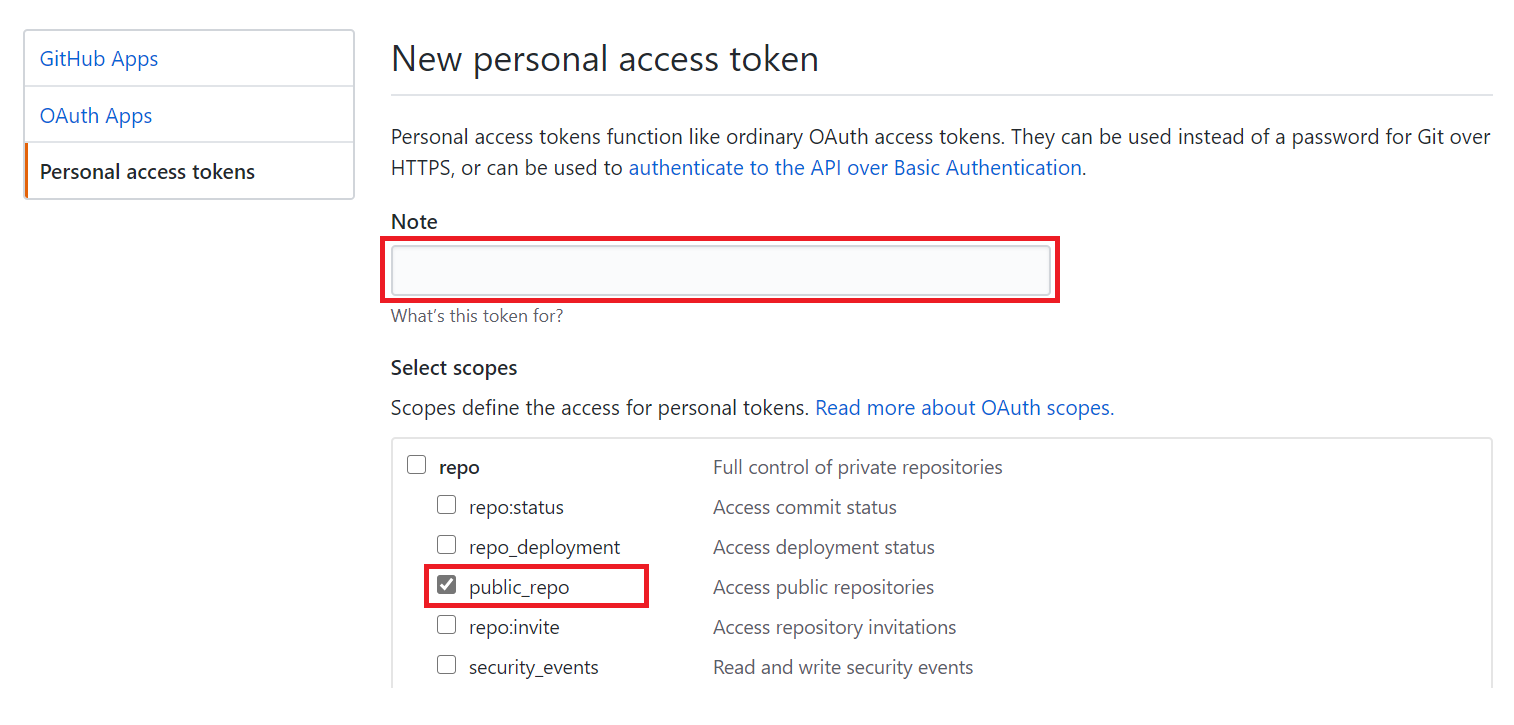
It is important to apply the Principle of Least Privilege when creating tokens and access credentials. Only select the roles/permissions needed for a task.
Copy the generated token.
Step 4. Configure GitHub Secrets #
Instead of hard-coding the connection strings and credentials in your workflow file, you can securely save them in GitHub secret manager. These secrets will be encrypted at rest and decrypted automatically when referenced as environment variables in the workflow file.
Never leave plain secrets your workflow file. Secrets will be committed to your repository and could become publicly available on the internet.
To save your secrets in GitHub secret manager:
Open GitHub and browse your repository.
Go to Settings > Secrets > New secret.

Save your storage account connection string, using the name
AZURE_STORAGE_CONNECTION_STRING.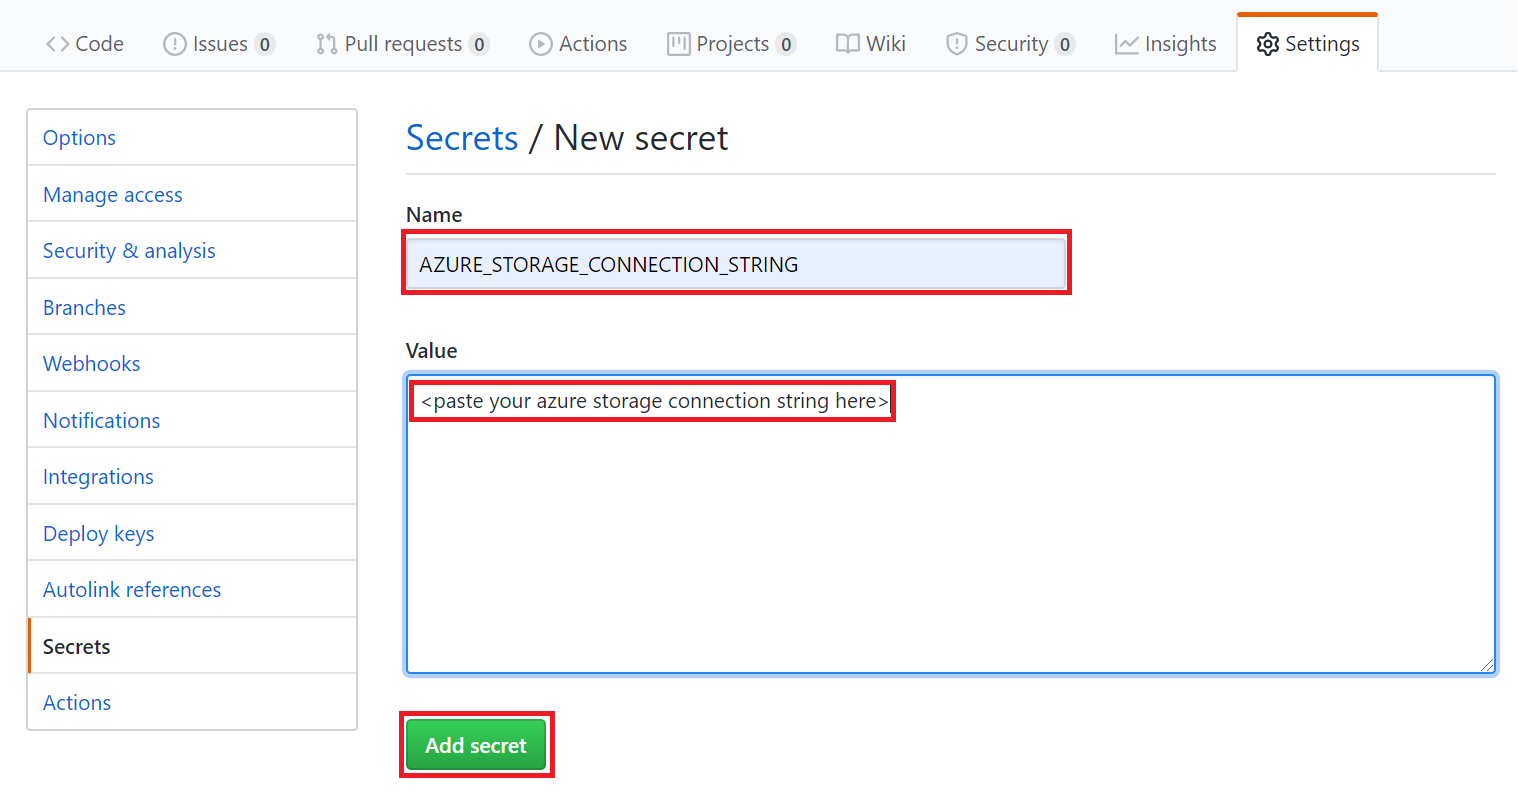
Save service principal credentials using
AZURE_CREDENTIALSas name.Save the name of your resource group as
AZURE_RESOURCE_GROUP.Save your Azure CDN Endpoint as
AZURE_CDN_ENDPOINT.It was a bit tricky to identify this in Azure Portal. As such, kindly find the endpoint and profile names highlighted. You can see this your resource group or All resources view.
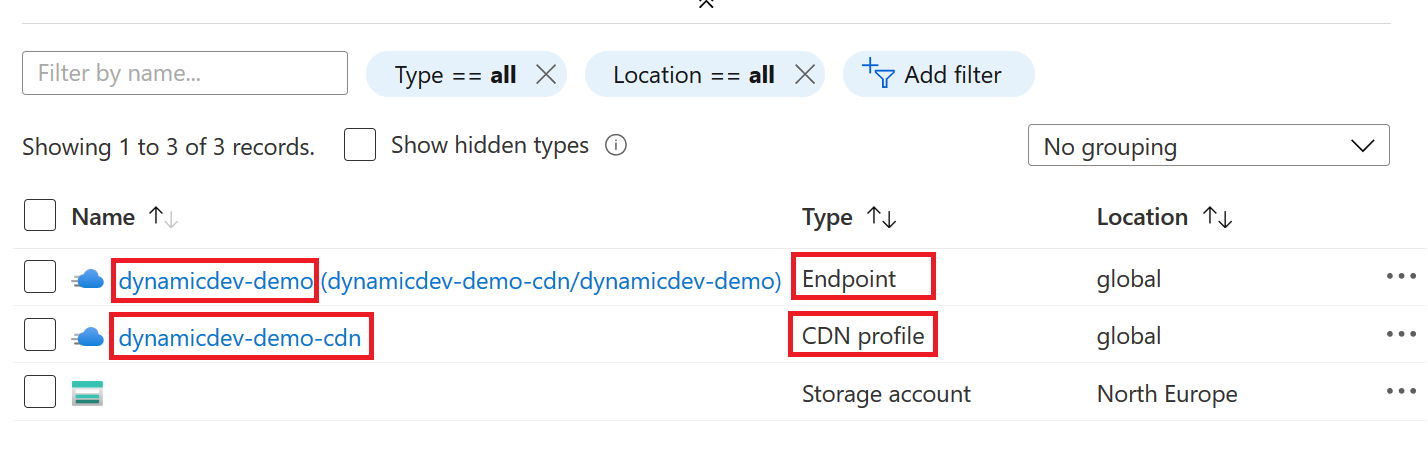
Save the Azure CDN profile name as
AZURE_CDN_PROFILE_NAME.Finally, save your GitHub personal access token as
TOKEN.
Step 5. Configure GitHub Actions workflow #
With your keys and credentials configured, you can now setup the GitHub Actions workflow.
Copy and save the code below in a file named:
build-and-deploy.yamlunder the path/.github/workflows. The file is also hosted on GitHub.name: CI/CD Release Pipeline on: push: branches: - master jobs: build-and-deploy: runs-on: ubuntu-latest steps: - name: Git Checkout uses: actions/checkout@v2 - name: Setup Hugo uses: peaceiris/actions-hugo@v2 with: hugo-version: "0.71.0" extended: true - name: Setup Azure Service Principal uses: azure/login@v1.1 with: creds: ${{ secrets.AZURE_CREDENTIALS }} - name: Build Project run: hugo --minify - name: Release Assets uses: peaceiris/actions-gh-pages@v3 with: personal_token: ${{ secrets.TOKEN }} publish_dir: ./public - name: Upload Assets To Azure Blob Storage uses: azure/CLI@v1 with: azcliversion: 2.6.0 inlineScript: | az storage blob delete-batch -s "\$web" --connection-string "${{ secrets.AZURE_STORAGE_CONNECTION_STRING }}" az storage blob upload-batch -d "\$web" -s ./public --connection-string "${{ secrets.AZURE_STORAGE_CONNECTION_STRING }}" - name: Purge Azure CDN Resources run: az cdn endpoint purge -n ${{ secrets.AZURE_CDN_ENDPOINT }} --profile-name ${{ secrets.AZURE_CDN_PROFILE_NAME }} --content-paths "/*" --resource-group ${{ secrets.AZURE_RESOURCE_GROUP }} --no-wait - name: Dispose Azure Service Principal Session run: | az logoutCommit and push these changes.
Browse your repository on GitHub. Select Actions tab to see the progress of your build and deployment.
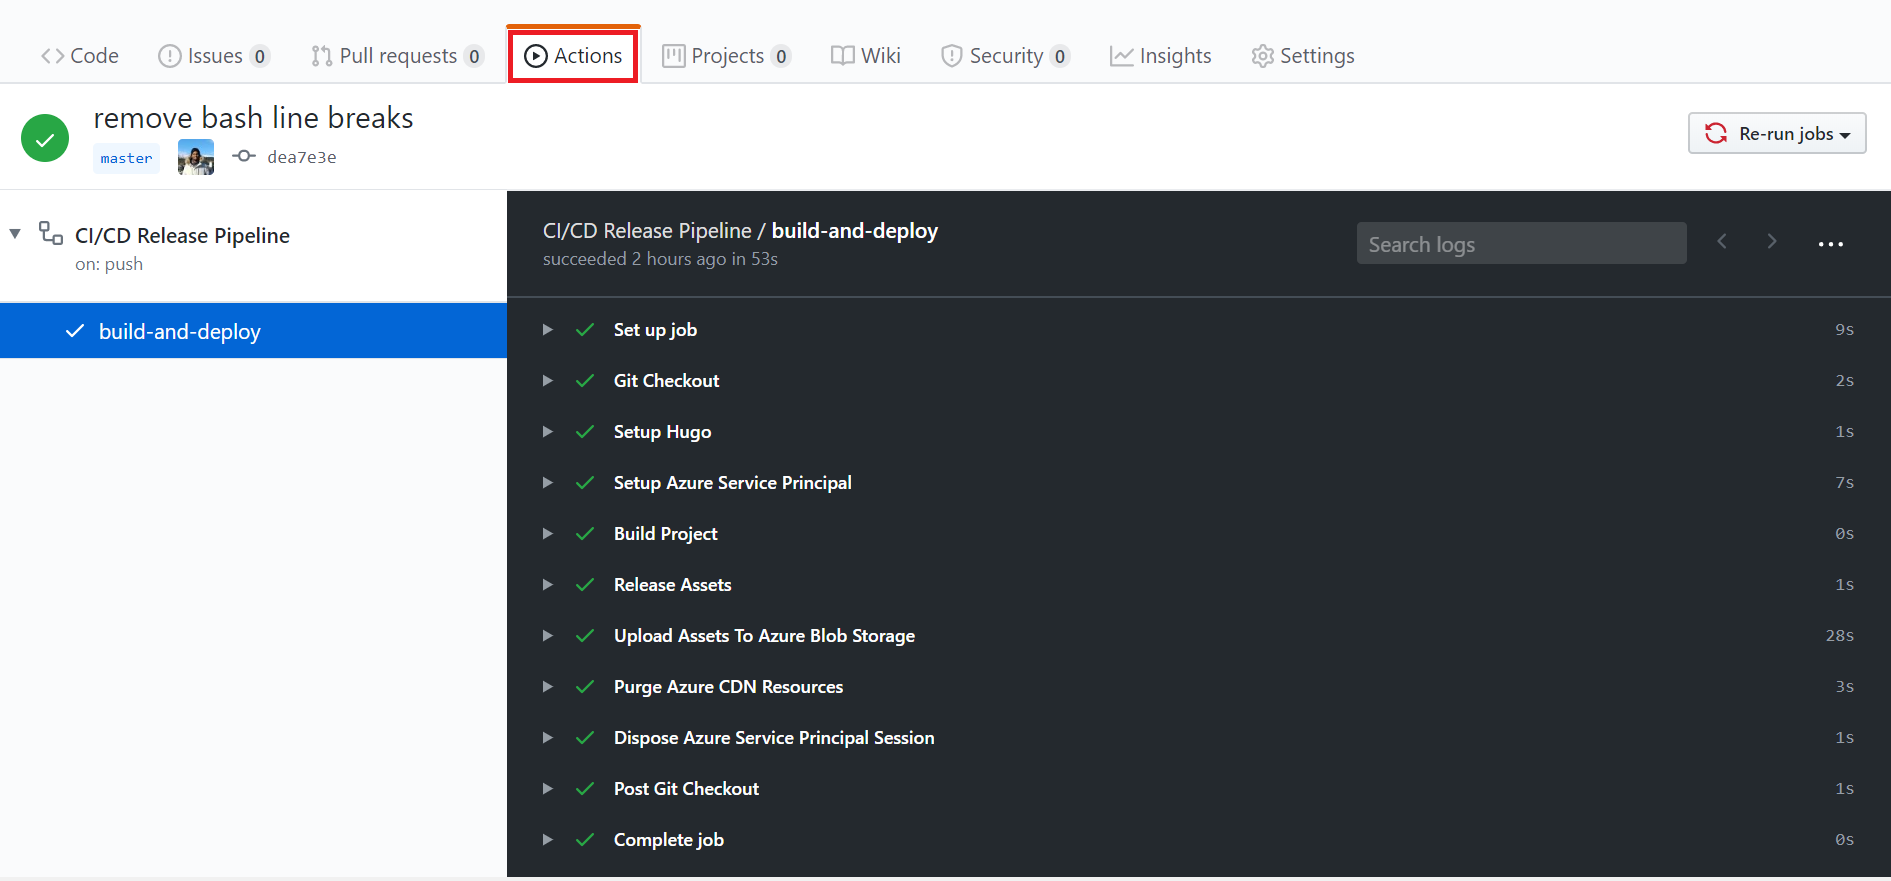
Open the website to check for updated content.
Fin
You can find the demo project here on GitHub.